Tuesday, November 4, 2014

Sarah Emily's New Room

My granddaughter and I were shopping for shower curtain fabric a few months ago when she saw a new line of fabric, Autumn Woods by Kate & Birdie Paper Company for Moda, that she wanted for her "next" quilt (she gets a new one every year).  We went ahead and purchased it.  She decided a couple of months ago she wanted to re-paint and decorate her room to match that fabric.  She chose a lovely gray that matches the background of the focus fabric for her walls and a darker gray for a couple of pieces of furniture.  I bought the paint for her, she painted her walls and trim and I painted the furniture. Then I got busy on  the quilt, curtains, pillow cases, and throw pillows (she wanted lots of yellow accents).


Saturday, September 13, 2014

Peg's Retreat

Pat's daughter, Rhonda, who lives in Virginia, was planning a trip to Huntsville to spend a week with her Mom, and they decided to get together at Peggy's for a sewing weekend.  I had never met Rhonda but had heard lots about her, so I decided to join them.  Peg's sister, Jeanette, also joined us for a little while, as well as our friend Anne. Had a great weekend!  Peggy had embroidered T-shirts for all of us.  We were Quilting Queens of Alabama.  She also had embroidered special names for all of us.  I was "Marsha-Marsha-Marsha," Rhonda was "Help Me Rhonda," Pat was "Trish the Dish," Anne was "Annie, Annie, Bo Bannie," Jeanette was "Net" and Peg was "Peggy Sue."    I headed home on Monday but the others stayed longer.  Below are a few pics from the week.

The Quilting Queens of Alabama:

                               Pat        Peggy       Anne       Jeanette    Rhonda         Marsha


Here are pics of the quilt tops we were working on:

Anne and Jeanette worked on one called The Deserted Highway.


Pat and Rhonda worked on one called Boston Commons:


Peggy had previously made two Boston Commons quilt tops as graduation gifts.  She tried to work on the Deserted Highway quilt but, being the hostess, she had way too many interruptions to finish that one.


I worked on one that I saw in the Keepsake Quilting Catalog.  It came as a kit called The Lady Kit.  I did not order the kit.  I just figured out the measurements from the picture and used my scrappy 2-1/2" strips to make mine.  It is still laid out on my design wall.  Not sewn together yet.


Rhonda also brought a beautiful quilt top for Show and Tell that she said she has been working on for years and is finally almost finished.


Thursday, September 4, 2014

String X Quilt

This one is for my daughter, Dana.  She saw a picture of one like it and wanted to "place an order for one like this, please."  It is a Bonnie Hunter free pattern.  I made this one king size and it required 144 of the string-pieced rectangles.  I decided to add a scrappy piano keyboard border of 2-1/2" x 6-1/2" rectangles, which required 192 of those.  But all of the fabric in this quilt top came from my stash. Love it when that happens!


Monday, September 1, 2014

ROLL TIDE ROLL!!

Recent texting conversation with my granddaughter, Sarah Emily................
Her:  If you need a suggestion for another quilt project, I have one!  LOL!
Me:  And what would that be?
Her:  The Alabama chevron lap quilt I sent you a picture of.......I know a nursing student who would love to have it.
Me:  I'm not sure I want to do one like that for just anyone.  Would take a lot of figuring and planning to get all the colors in the right place.
Her:  I meant for me!  LOL!  But I understand.
Me:  It's too late in the day for me to figure out a "hidden meaning" in a text.  But I will give it some thought...you might be worth it.
Her:  You crack me up!

Needless to say, she got her Alabama Crimson Tide chevron lap quilt and was happy with all the fabrics I found in my stash...didn't have to buy a thing!!  She said it was "freakin' AWESOME!!"

Front of quilt                                                                Back of quilt

Friday, August 8, 2014

Quilt Ladder

Here's the quilt ladder that my brother Mike (twin) built for me.  Made from white oak.  It holds 8 quilts and six of these are queen size, made from Bonnie Hunter's free patterns or mystery quilts.  Top row:  Easy Street mystery and Sister's Choice free pattern; Second row: Scrappy Trips and Oklahoma Backroads free patterns; Third row: Cathedral Stars free pattern and Lazy Sunday mystery.  Bottom row:  Ada's Stars and Li'l Twister.  So excited to have this new way to display some of my quilts.


Wednesday, July 9, 2014

Cathedral Stars

This is the latest of the quilts I have made from Bonnie Hunter's free patterns.  However, I did use a different technique for the star points which was from a pattern called Rising Stars, a Strip Club pattern from Cozy Quilt Designs.  My granddaughter helped pick out the border fabric.


My New Bag

Over a year ago, my sister who lives in Hickory, North Carolina, asked me to start saving the selvage edges of my fabrics for her.  When I was cutting (or tearing) them off, I included about 1/2" of the fabric design. She came to visit for the 4th of July weekend and I just have to share what she brought me made from some of those selvages.  A large tote bag, measuring 20 x 12 x 5 !!  I love it!!  Thank you, Jane!


She also made me a cosmetic bag and a couple of hotpads.  But I was most excited about this.

Monday, June 30, 2014

Lake Retreat

Three of my quilting friends from Huntsville, Alabama came to Andalusia on June 27, 2014 and we spent the weekend at the lake house belonging to a local quilting friend.  I had a mystery quilt planned for the weekend.  So we sewed, ate lots of good food, sewed, ate lots of good food, sewed, etc. etc.  We did take a break for a pontoon boat ride on Saturday afternoon.  Here are a few pictures of the quilting ladies and their mystery quilt tops (except for borders).  We had a great time!


Friday, May 30, 2014

Round Robin

When my sister was here for Thanksgiving, she told me about a class she is taking in Winston-Salem, NC, called Head for the Border.  The purpose of the class is to challenge creativity and quilting skills by making your own Round Robin quilt.  Skills to be learned:  designing borders, using math to make them fit the previous round, use of color and piecing skills.  The group meets once a month.  The first step for the members was to decide on their center block, which could be either square or rectangle, and one measurement being at least 12" to 18" finished size.  Color chips were placed in one bag and various design elements (square, rectangle, triangle, flying geese, quarter square triangles, etc.) were placed in another bag.  At each meeting, a color and design element are drawn from the bags to indicate what is to be used in the next round of the quilt. Unlike other round robins, each person works only on their own quilt.  Unlimited spacer/accent borders may be used throughout the quilt and border width is each person's personal choice. Cornerstones may also be used.

So I decided that even though I cannot attend the classes, my sister can send me the information each month and I can do this along with them.  She already had the information for the first round, so I was able to start with a center square and first border.

Here's my center square.  The name of this block is Chicopee Square and I found it in an issue of Quilt Magazine.


November - Round 1:  The first color and design element that had been drawn were black and a rectangle.....so here's my square and first "round."


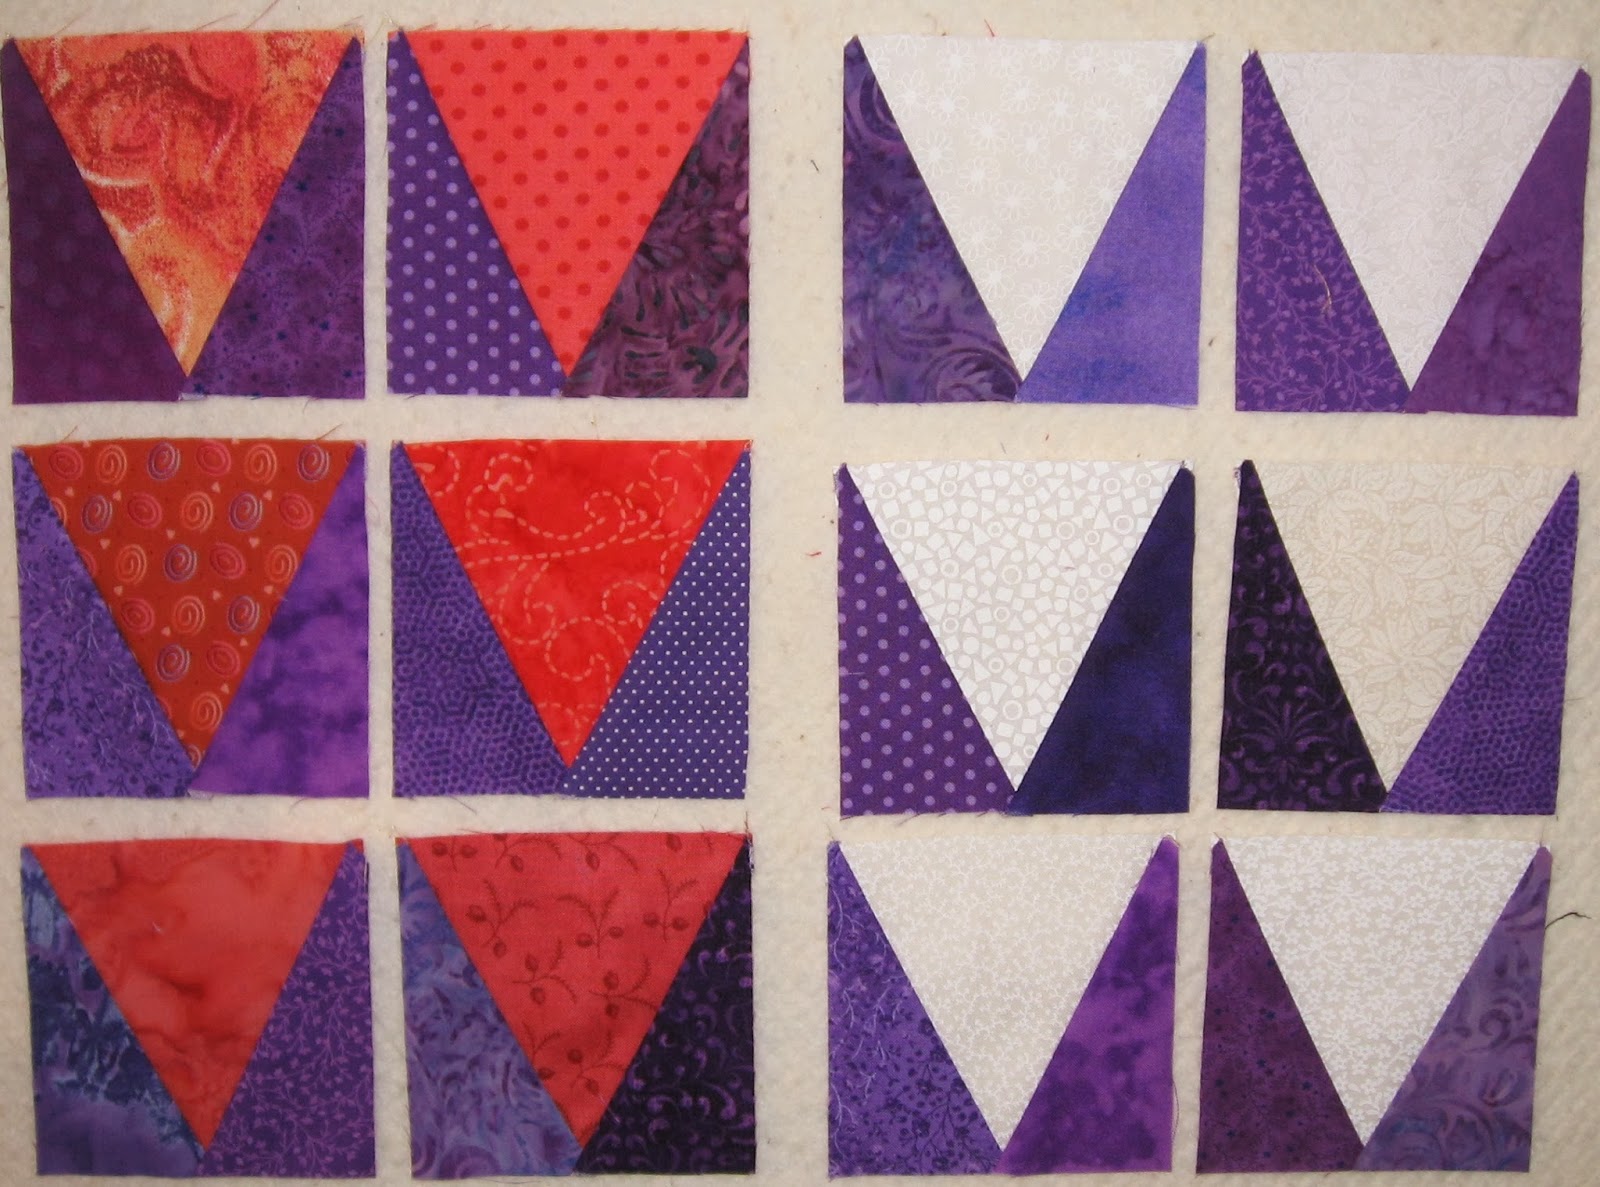
December - Round 2:  They had another meeting this week and the color drawn is green and the design element is flying geese. Since I had some flying geese elements in my center square, I decided to just carry them over into this second "round."  (Probably should have used the flying geese all the way around, but it's MY quilt, so I did it like I wanted to.......anyone surprised?!)


Will continue to add to this post each month as I add another "round."  Not sure how many more "rounds" there will be.

January - Round 3:  Color and design element drawn for Round 3 are brown and squares.  I chose to do a Seminole border, using red with the brown I chose.  Then I went ahead and added a black spacer border to make the quilt now measure 30-1/2 square (30" finished), so that will give me several size options for the next border.


No meeting in February, so I will have to wait until end of March for next color and element.

March - Round 4:  Color is purple and design element is square-in-a-square.  Since my Seminole border squares are on point, I decided to add two sets of triangles to my square-in-a-square block so that the square would sit square in this border.  The squares are 3" finished and the rectangle spacers are 1-1/2" x 3" finished.  The quilt now measures 36-1/2" square (36" finished).


April - Round 5:  Color is orange and design element is a quilt block.  I decided to use a 6-inch Sawtooth Star block.  The orange is a batik fabric with yellows, greens, purples, and turquoises in the pattern.  I added another narrow black border to make my block finish at 54" so that gives me several different sizes I can use for my next and final Round Robin border.


May - Final Border:  The final design element was applique and the colors that were left were red, blue and yellow. The instructions were that we could add a border with any or all of the colors with applique on the border or we could put applique anywhere else on the quilt we wanted.  Since I don't like to do applique, I chose the simplest design and method, fusible web, and added a flower to the center of my beginning block. I added a yellow batik border.  Most all of the fabric in the quilt are batiks.  Here is the final quilt.   It will measure 62" square when finished.   I will bind with black when I finish quilting it.


Wednesday, May 28, 2014

Carolina Backroads

This is another queen size quilt made from a Bonnie Hunter free pattern called Oklahoma Backroads.  Since I live in Carolina Community outside of Andalusia, Alabama, I am calling mine Carolina Backroads.

It was just another fun, scrappy quilt to do.  All of the fabrics, backing included, came from my stash.  I mixed batiks with traditional cottons.  Love it when that happens!  Here are pics of front and back.


Sunday, May 4, 2014

Bamboo & Pinwheels

I saw the Bamboo quilt in a shop near Hickory, NC, when visiting my sister a few years ago. When you purchase the required amount of fabric for a particular size called for in the instructions, construct the number of blocks called for with the simple strip piecing method, cut that block on the diagonal, you will get enough blocks for two completely different quilts that size.  The pattern is called Bamboo and Pinwheels by Diana McClun and Laura Nownes.  Here are the two twin size quilts I got using a variety of batiks from my stash.

Bamboo


Pinwheels


Thursday, March 20, 2014

Quilts for the Grandkids

My brother asked me to make quilts for his three oldest grandchildren to have when they come to visit him.  He has a set of Twin XL bunk beds he built, as well as a twin bed.  Jordan, who is 9, likes orange.  Morgan, who is 8, likes pink/purple.  Ethan, who is 7, likes red.  So here are the quilts I made for them.


Quilt Blocks for MS

Someone shared a Facebook post about Quilt Blocks for MS......since I had fabric scraps in all the colors requested for the blocks, I decided to do a scrappy quilt to donate.   I made four-patches, then cut 4-1/2" squares to pair with them to make a block.  Laid them out in this format.    The only fabric I had to purchase was for the outer border and the backing.  Sew much fun to do a quilt when you have so much of the fabric already in your stash!!


Saturday, January 11, 2014

Scrappy Trips

Another Bonnie Hunter freebie.  I had bunches of 2-1/2" strips of batik scraps already cut, so decided to try this pattern.  Ended up making it queen size.


Monday, January 6, 2014

Celtic Solstice Mystery

It's time for another Bonnie Hunter mystery.  These are my fabrics.  I am using a variety of off-white tone-on-tones for my neutrals.  My other colors are coral, teal, lime, and purple.  MY GRANDDAUGHTER, SARAH EMILY, WANTED ME TO BE SURE AND LET EVERYONE KNOW THAT THIS ONE IS FOR HER!!  So I will be adding borders to make it large full size.


We received Part 1 this morning.  I have a Christmas quilt I have to get quilted and in the mail ASAP, so I have not started on the mystery but I do plan to have something ready to link on Monday.

Finally got started on Part 1 and below is a sampling of my star-point blocks, cut with my Tri Recs tool. I made 92 with the coral triangle and 96 with the white.  These are 3" finished units.  Looking forward to Part 2 on Friday.


Part 2 received on Friday, December 6, to make 100 of these "chevron" units, which will be 3" finished.   These are using my teal (it might look more blue in the picture, but it is teal) and lime/chartreuse fabrics, along with more neutrals.


Part 3 received on Friday, December 13, to make 200 - 2" half-square triangle units (using my coral and lime/chartreuse fabrics), which will be 1-1/2" finished.  Using 100 of these units, we are to make 25 pinwheel units, which will be 3" finished.  I used the Easy Angle ruler to cut my triangles and have made 100 of the half-square triangle units and six pinwheel blocks so far.  Will have the rest finished before Part 4 comes out on Friday.


Part 4 received on Friday, December 20, to make 120 4-patch units that will be 3" finished, combining teal and coral this time.  Am still working on them, but have finished enough to share here.


Part 5 received on Friday, December 27, to make 100 of these units, using the 100 half-square triangles made in Part 3.  Neutral triangles were added to either side of the half-square triangles already made, then a large purple triangle was added to finish the Part 5 unit.  This unit, as all others, will be 3" finished.  I still have about 50 more to make, but I have been grand-dog and great-grand-dog sitting this weekend and have had numerous interruptions. I will have them all finished before Part 6 comes out next Friday, though. And I am hoping that the final layout will be revealed soon!!


We were surprised with Bonnie sending us the final layout for our Celtic Solstice on New Year's Day.  Here's what I have finished so far.  I am planning to add an additional border at the top and bottom, then two more borders all the way around to make it a rectangle shape for my granddaughter's full size antique four-poster bed.  Still have to shop for the border fabrics, which I plan to do at the end of the week.  Will post the finished top later.......